
How to Test Your Starter Out of the Car Step by Step
Quick Answer
To test your starter out of the car, secure the removed starter in a bench vise, connect a suitable battery to its power terminal and housing, then briefly activate the solenoid using a remote starter switch. The starter gear should extend and spin smoothly. This bench test checks basic operation but cannot prove performance under engine load.
- Confirm the starter’s voltage rating and terminal layout.
- Secure the starter and prepare a charged battery.
- Connect battery positive to B+ and negative to the starter housing.
- Briefly activate the S terminal using a suitable remote switch.
- Observe gear movement, motor speed, and unusual noises.
A car starter that clicks, cranks slowly, or refuses to turn the engine can be difficult to diagnose. If you have already removed the starter, a bench test can help narrow down the problem without reinstalling it first.
This guide explains the tools, connections, safety precautions, and testing steps for a conventional automotive starter. You will also learn what different test results mean and when further diagnosis is needed.
What Does Testing a Starter Outside the Car Show?
Testing a starter outside the car checks whether its motor and solenoid can operate without turning the engine. Mechanics call this a starter bench test or a no-load test.
The starter motor uses electrical power to rotate a small drive gear called the pinion. A solenoid, which acts as an electrically operated switch, helps move that gear and supply power to the motor.
During a bench test, you can check several functions:
- Whether the solenoid responds when activated.
- Whether the pinion gear moves into its engaged position.
- Whether the motor rotates without obvious hesitation.
- Whether the motor makes unusual grinding or scraping sounds.
- Whether the drive gear retracts when power is removed.
- Whether the starter works consistently during repeated brief tests.
A starter that fails these checks may have an electrical or mechanical fault. However, smooth operation without engine load does not prove that it can produce enough torque to crank an engine.
According to DENSO starter system diagnosis guidance, a proper test bench can measure starter performance against specifications. A basic battery test is useful, but it does not replace that equipment.
What Tools Do You Need to Bench Test a Starter?
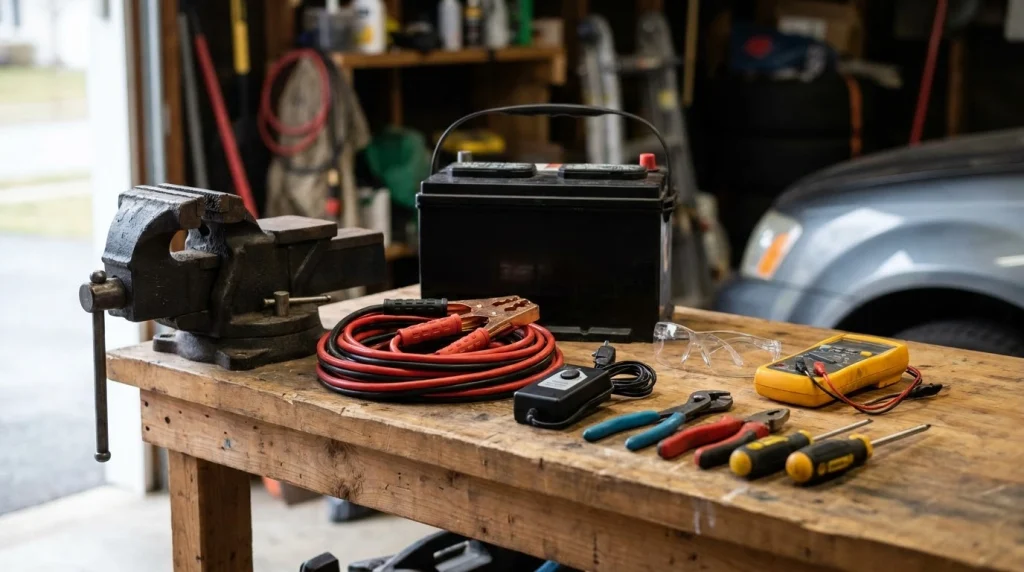
A basic starter bench test requires a suitable battery, heavy-duty cables, a secure mounting fixture, and a way to activate the solenoid safely.
Prepare these items before connecting power:
- Compatible automotive battery: A charged battery matching the starter’s rated voltage.
- Heavy-duty jumper cables: Cables suitable for handling starter motor current.
- Remote starter switch: A properly rated momentary switch for activating the solenoid.
- Bench vise: A sturdy vise with suitable protective jaws or an approved starter testing fixture.
- Safety glasses: Eye protection against accidental sparks and flying debris.
- Digital multimeter: An optional tool for checking battery voltage.
- Insulated tools: Tools for preparing and securing electrical connections.
What Battery Should You Use?
Use a charged battery with the correct voltage for the starter being tested. Many conventional passenger-car starters use a nominal 12-volt system, but not every starter has that rating.
DENSO identifies approximately 12.6 volts as the charged resting voltage for a conventional 12-volt automotive battery. A weak battery may cause a healthy starter to operate slowly or fail the test.
Check the starter identification and service information before connecting power. Never assume that a commercial-vehicle starter or specialized starting system uses the same voltage.
How Should You Secure the Starter?
Secure the starter by its mounting flange or another manufacturer-approved mounting point. Its motor produces a sudden reaction force when energized.
Use protective vise jaws where required, and avoid crushing the motor housing. Position the assembly so the gear can move freely without touching the vise, bench, or surrounding objects.
Never hold the starter in your hands while powering it. Do not rely on somebody standing on the starter to keep it from moving.
How Do You Identify the Starter Motor Terminals?
Most conventional solenoid-operated starters have a large battery terminal, a smaller control terminal, and an electrical ground through the housing.
Terminal arrangements vary, so use the starter’s wiring diagram rather than appearance alone.
The following table explains the common connections.
| Connection | Function | Bench Test Role |
|---|---|---|
| B+ terminal | Receives battery power | Connects to battery positive |
| S terminal | Activates the solenoid | Receives controlled power through the remote switch |
| Starter housing | Provides the ground path on many conventional starters | Connects to battery negative |
| Motor terminal | Carries power from the solenoid into the motor | Not the main battery connection in this procedure |
The most important distinction is between the large B+ input and the motor output terminal. Connecting battery power to the wrong terminal can bypass the intended solenoid operation.
Some starters use external solenoids or different control circuits. Do not apply this wiring procedure unless the terminal identification matches the starter manufacturer’s instructions.
How to Test Your Starter Out of the Car Step by Step
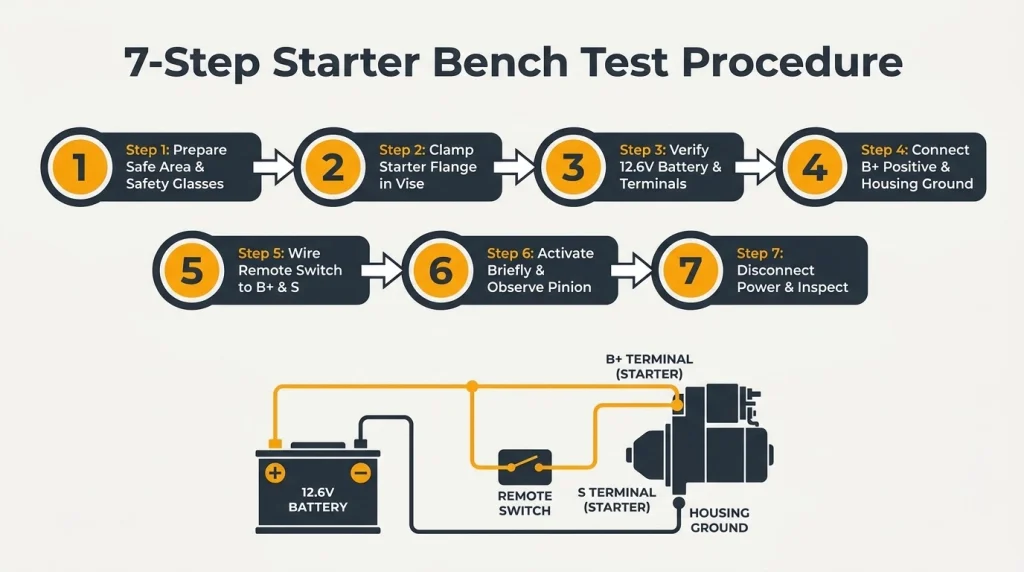
Bench testing a conventional starter involves securing the assembly, connecting its power and ground, and briefly energizing the correct solenoid terminal.
The procedure below applies to a compatible starter with an integrated solenoid and an identified S terminal. Follow its service manual if the connection arrangement differs.
Step 1: Prepare a Safe Testing Area
Begin with a dry, ventilated work area and a stable bench. Keep flammable materials, loose tools, and other metal objects away from the battery and starter connections.
Wear safety glasses and remove loose jewelry. Inspect the battery for cracks, leaks, or obvious damage before use.
Warning
Starter motors can jump when energized, and battery shorts can cause burns or fire. Secure the starter firmly and prevent accidental electrical contact.
Battery safety also matters because lead-acid batteries can release flammable gas. The OSHA battery safety guidance explains the hazards of sparks, electrical shorts, and battery acid.
Step 2: Secure the Starter in a Vise
Mount the starter firmly using an approved clamping point. Do not tighten a vise directly around a delicate motor housing.
Make sure the starter cannot twist, slide, or fall when activated. Leave enough clearance for the pinion gear to extend and rotate.
Step 3: Confirm Battery Voltage and Terminal Labels
Check the battery voltage with a digital multimeter before testing. Confirm that the battery matches the starter’s electrical rating.
Identify the B+ terminal, S terminal, and ground connection from the starter’s service information. Check for loose connections, damaged terminals, or exposed wiring.
Step 4: Connect the Battery Cables
Connect the heavy positive cable to the starter’s B+ input and the negative cable to its designated ground connection. On many conventional starters, that ground is a clean metal area of the housing.
Arrange the connections according to the test equipment instructions, making the final battery connection only when the circuit is prepared. Keep the remote starter switch released throughout setup.
Make sure no exposed positive connection can touch the starter housing. Keep all cables clear of the moving pinion gear.
Step 5: Connect the Remote Starter Switch
For the conventional setup described here, connect a suitable momentary remote starter switch between B+ and the identified S terminal.
The switch allows you to activate the solenoid without holding a loose wire against a live terminal. Follow the switch manufacturer’s instructions and keep its leads away from moving components.
Do not bridge unidentified terminals using a screwdriver. That can cause an uncontrolled short or bypass the intended testing circuit.
Step 6: Briefly Activate the Starter
Stand clear of the rotating gear and activate the remote switch briefly. Observe the starter while keeping your hands, clothing, and tools away from moving parts.
On a typical pre-engaged starter, the solenoid should move the pinion outward and the motor should rotate. Release the switch promptly rather than allowing the motor to run continuously.
Stop immediately if the starter moves in its fixture, smokes, produces unusual sparks, or makes a severe grinding sound.
Step 7: Disconnect Power and Inspect the Results
After releasing the switch, wait until all movement stops. Disconnect the battery using the safe sequence specified for your equipment before adjusting any test connections.
Look for damaged cables, overheated terminals, sticking components, or unusual signs of wear. Record whether the starter responded smoothly, clicked without turning, or failed to respond.
A successful visual test confirms basic movement and rotation. Further performance testing may still be required before deciding that the starter is fit for service.
How Can You Tell Whether the Starter Passed the Test?
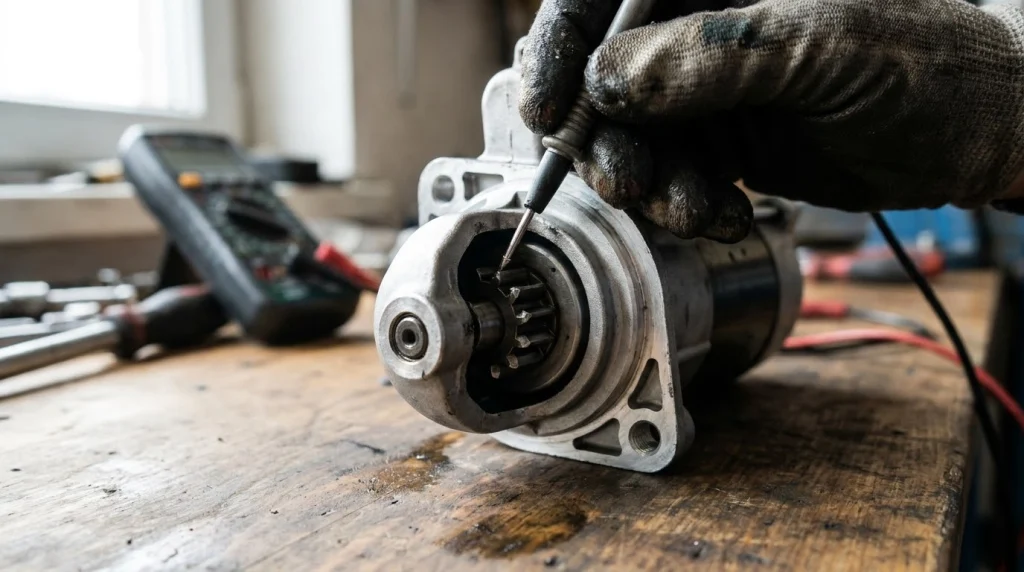
A conventional starter appears to pass a basic bench test when its pinion extends, spins smoothly, and retracts after power is removed.
The following comparison shows what common results may suggest.
| Test Result | Possible Explanation | Next Check |
|---|---|---|
| Gear extends and spins | Basic motor and solenoid functions operate | Check performance under load if needed |
| Click without rotation | Weak power supply, poor connection, defective contacts, or motor fault | Check battery and cables, then test starter performance |
| Slow or uneven rotation | Low voltage, resistance, worn brushes, or mechanical drag | Confirm supply voltage and inspect the motor |
| No response | Open circuit, incorrect connection, failed solenoid, or motor problem | Verify connections and the starter control circuit |
| Motor spins but gear does not engage | Possible drive mechanism or engagement fault | Inspect solenoid travel and drive assembly |
No single symptom proves that a particular internal part has failed. Battery condition, cable resistance, starter design, and mechanical damage can affect the result.
Can You Test a Starter With a Multimeter?
A multimeter can check battery voltage and parts of the electrical circuit, but it cannot measure the starter’s full mechanical performance by itself.
Before connecting a starter, set the meter to the appropriate DC voltage range. Measure across the battery terminals to confirm that the supply is suitable.
For a conventional 12-volt lead-acid battery, DENSO recommends checking for a fully charged condition near 12.6 volts. A reading that indicates a discharged battery should be addressed before testing the starter.
A multimeter can also help identify poor electrical connections during an appropriate circuit test. However, voltage readings alone cannot confirm that the starter produces sufficient torque.
Do not connect a normal multimeter’s current input directly across the starter’s power circuit. Starter current can exceed the meter’s rating and damage the instrument.
Professional starter testing equipment can measure electrical performance under controlled conditions. Compare those results with the specifications for the actual starter model.
What If the Starter Works on the Bench but Not in the Car?
A starter that works outside the car may still fail to crank the engine because of a weak battery, poor electrical connections, or insufficient performance under load.
Bench testing removes the resistance created by turning the engine. A worn starter may spin freely without that load but struggle when installed.
Before replacing the starter, consider these possible causes:
- Weak battery: The battery cannot supply enough power during cranking.
- Corroded battery terminals: Resistance reduces the voltage reaching the starter.
- Damaged ground strap: The starter lacks a dependable return path.
- Starter control problem: The relay, ignition switch, wiring, or safety interlock may interrupt activation.
- Damaged ring gear: Worn or broken flywheel teeth may prevent engagement.
- Mechanical engine resistance: Excessive drag or a seized component may prevent normal cranking.
The most useful next step is an on-car battery and voltage-drop test. A voltage-drop test measures electrical loss across connections while current flows.
DENSO’s starter troubleshooting guidance explains how positive and negative circuit resistance can cause slow cranking. It also distinguishes electrical connection faults from problems inside the starter.
If battery and cable tests pass, have the starter checked with a suitable performance tester. If the engine itself cannot rotate normally, investigate that problem before installing another starter.
What Common Mistakes Should You Avoid?
The most common bench-testing mistakes involve insecure mounting, poor connections, incorrect terminals, and drawing conclusions from a no-load test alone.
Avoid these problems:
- Testing an unsecured starter on the floor or workbench.
- Using a discharged battery and assuming the starter has failed.
- Connecting battery positive to an unidentified terminal.
- Allowing cables or clothing near the spinning pinion.
- Running the starter longer than its specified testing interval.
- Ignoring abnormal noise, smoke, or overheating.
- Assuming free rotation proves the starter can crank an engine.
Some starters use different control arrangements, voltage ratings, or integrated electronics. Testing them using a conventional circuit without confirming compatibility can cause damage.
For unfamiliar starters, identify the exact part and consult the manufacturer before applying power.
When Should You Have the Starter Professionally Tested?
Professional testing is appropriate when basic bench results are unclear, the starter behaves inconsistently, or the vehicle still has a cranking problem.
A repair shop may use a dedicated starter test bench to evaluate performance against manufacturer specifications. The equipment can provide information that a simple visual test cannot.
Consider professional testing when the starter:
- Spins freely but struggles to crank the engine.
- Works during some tests but fails during others.
- Produces unexpected noise or abnormal vibration.
- Shows damaged wiring, terminals, or mounting points.
- Uses an unfamiliar electronic control or voltage system.
A confirmed solenoid fault does not always require replacing the entire starter. Some designs allow separate solenoid replacement, while others require replacement of the assembly.
Use the service information and test results to decide whether repair or replacement is appropriate.
Remote Starter Switch
A properly rated remote starter switch provides controlled, momentary activation of the solenoid during a compatible starter bench test.
Frequently Asked Questions
Can you bench test a starter with a jump pack?
Some portable jump packs can supply enough current for starter testing, but suitability depends on the pack and starter specifications. Protective circuits may interrupt the test or produce misleading results. Use a compatible battery or approved test equipment unless the jump pack manufacturer supports this application.
Should the starter gear retract after the test?
The pinion gear on a conventional pre-engaged starter should normally retract after the solenoid is de-energized. The return mechanism moves the gear away from its engaged position. A gear that sticks or fails to retract may indicate a mechanical or solenoid problem requiring inspection.
Can a starter pass a bench test with worn brushes?
A starter with worn brushes may still pass a brief no-load test if electrical contact remains sufficient during that attempt. Brush wear can cause intermittent operation or reduced performance under load. A passing visual test therefore cannot rule out every internal motor fault.
Does every car starter spin in the same direction?
Starter rotation direction depends on the motor’s design and its intended vehicle application. Different assemblies may use different configurations, so rotation direction alone is not a universal pass-or-fail indicator. Check the manufacturer’s specification before deciding that a starter rotates incorrectly.
Can you bench test a starter from a hybrid car?
A hybrid vehicle’s starting system may differ substantially from a conventional starter motor and may involve high-voltage components. Do not apply ordinary battery jumper testing without confirming the system design and approved procedure. High-voltage service requires appropriate training and safety equipment.
What if the starter only works after tapping it?
A starter that operates only after tapping may have intermittent internal electrical contact or a sticking mechanical component. Possible causes include worn brushes, damaged contacts, or a faulty solenoid. Tapping is not a reliable repair, and repeated impact can cause additional damage.
Conclusion
Knowing how to test your starter out of the car helps you check basic solenoid engagement and motor rotation before reinstalling the assembly. If the starter spins properly but the engine still will not crank, test the vehicle’s battery and wiring, then consider a professional starter performance test.

Alex Carter is an automotive content writer at VastAutoParts, focusing on car parts, vehicle troubleshooting, automotive tools, product research, and practical car care guides.